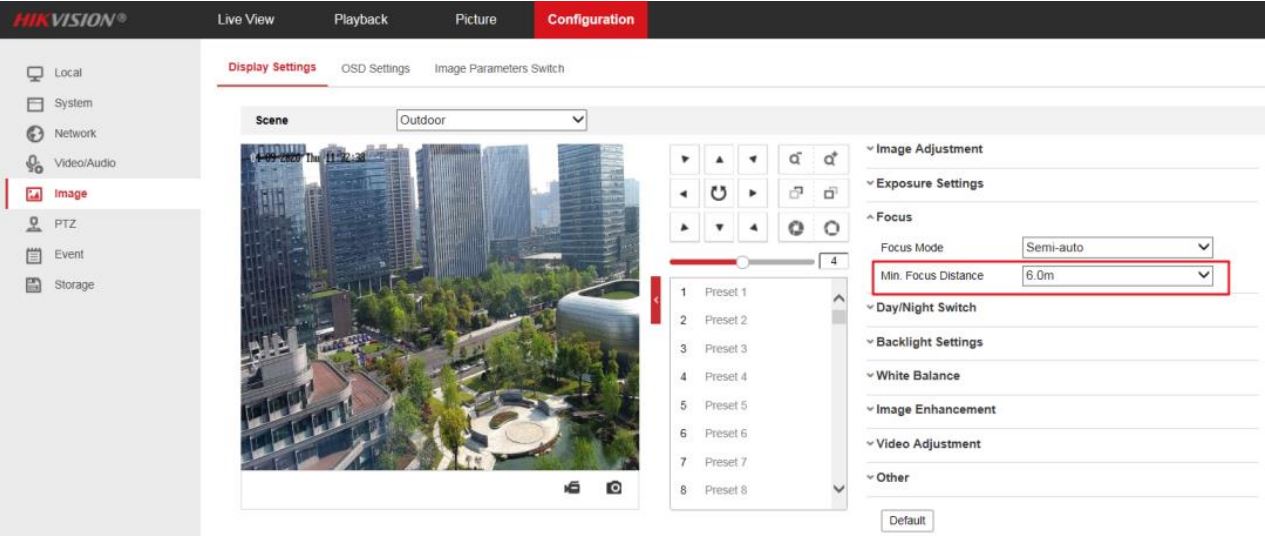
Go to Configuration->Image->Display Setting->Focus interface, the Min. Focus Distance is recommended to be set to 6.0m for outdoor scene and 1.5m for indoor scene
2) Setting an inappropriate Min. Focus Distance may cause slow or unfocused problems. To choose the right Min. Focus Distance according to the actual monitoring distance.
2. Lens Initialization
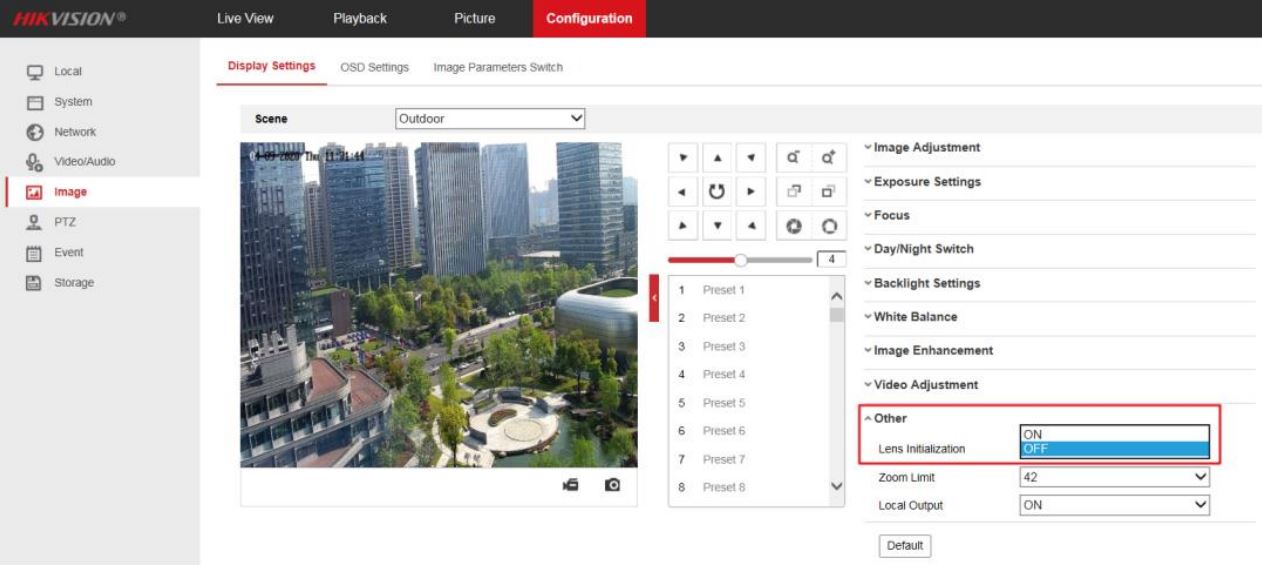
1) Go to Configuration->Image->Display Setting->Other interface, the lens get initialized when you enable the Lens Initialization. The Lens initialization can solve the focus issue caused by poor focus curve.
Note: Once the lens initialization is enabled, it will be initialized at one o’clock every day.
3. Preset
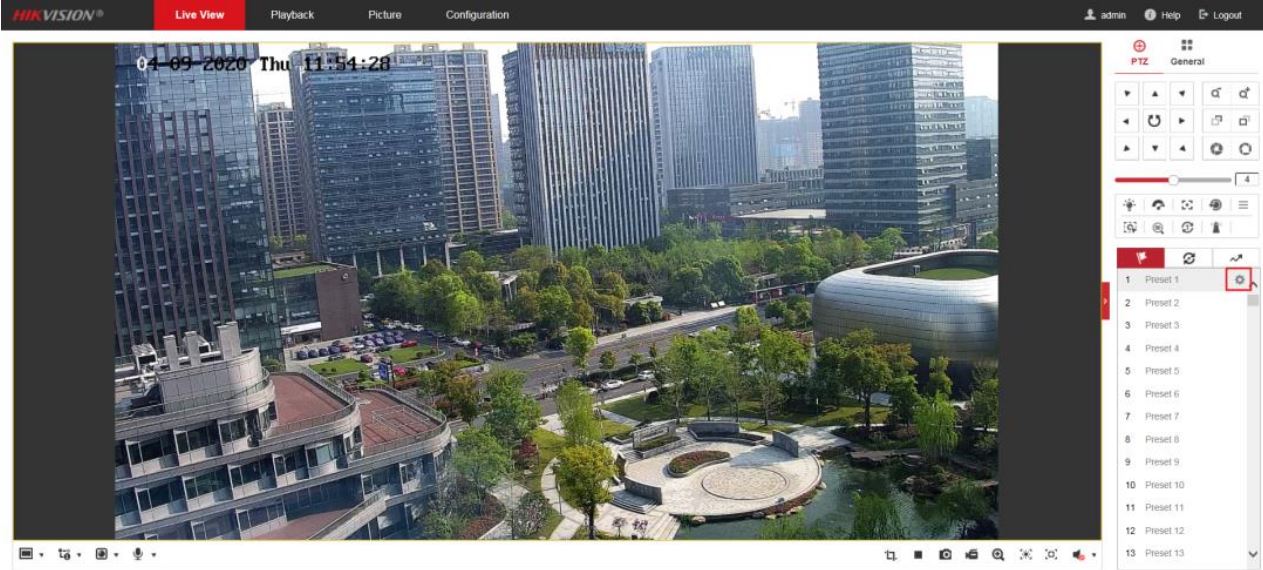
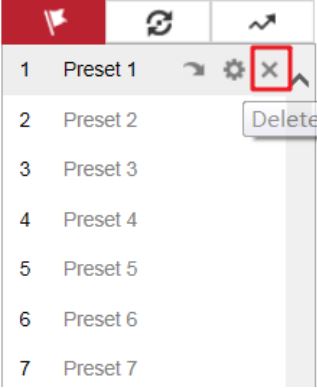
A preset is a predefined image position. For the defined preset, you can click the calling button to quickly view the desired image position. 1) Go to Live View->PTZ interface, select the preset which you want to set, left click on Set.
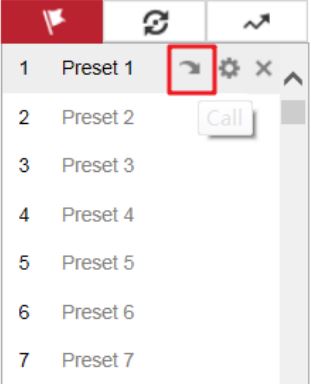
2) Click Call to let the PTZ camera go to the position corresponding to the preset you selected.
3) Click Delete to delete the preset.
4. Patrol
A patrol is a memorized series of preset function. It can be configured and called on the patrol settings interface. There are up to 8 patrols for customizing. A patrol can be configured with 32 presets.
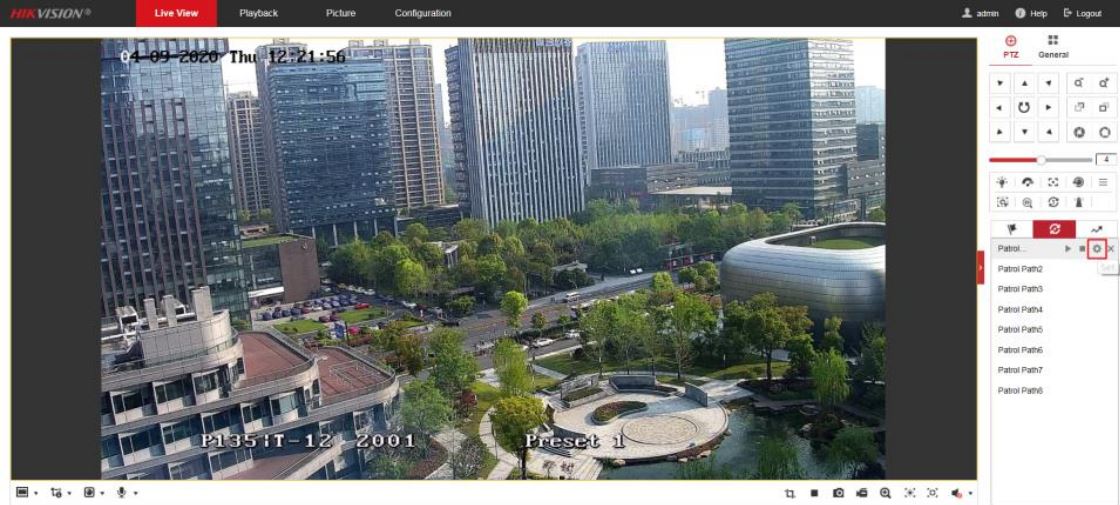
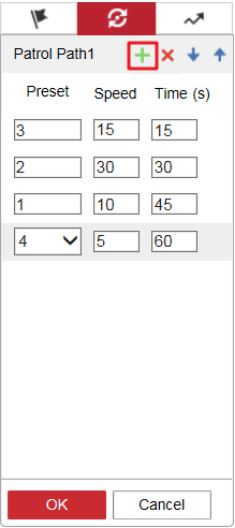
1) Go to Live View->PTZ interface, and add several preset first. 2) Choose the Patrol Path which you want to set, and left click on Set. Click the green + sign in the pop-up interface to add the preset, configure the Speed and Time and click OK to save the setting.
Note: The dwell time of the preset cannot be set less than 15 seconds, this is to ensure that the slip ring has a longer service life.
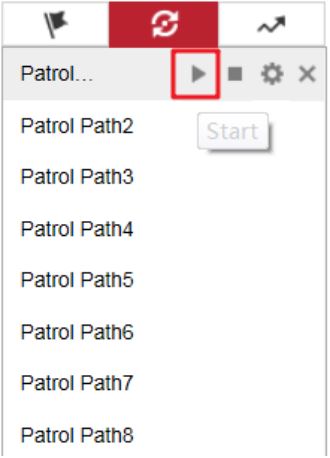
3) Click Start to call the patrol, the PTZ camera will patrol between various preset points according to the configuration.
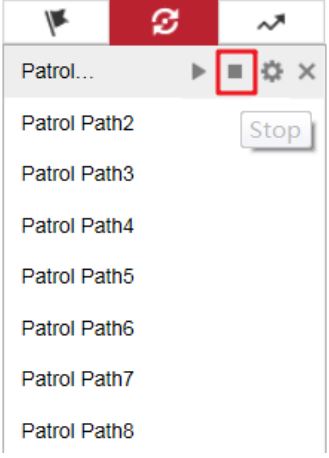
4) Click Stop to interrupt the ongoing patrol.
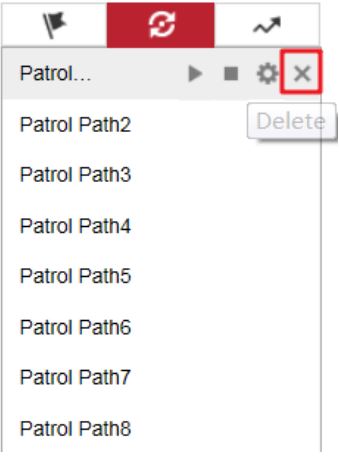
5) Click Delete to delete the patrol.
5. Pattern
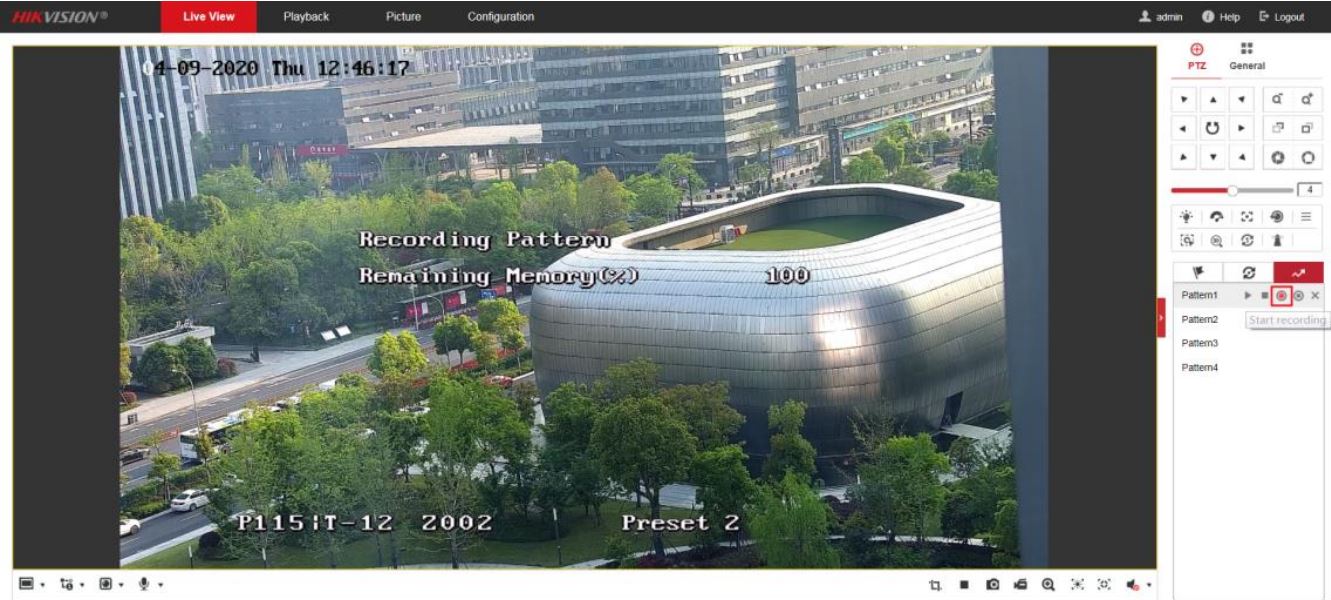
A pattern is a memorized series of pan, tilt, zoom, and preset functions. It can be called on the pattern settings interface. There are up to 4 patterns for customizing. 1) Go to Live View->PTZ interface, choose the Pattern which you want to set, and left click on Start Recording.
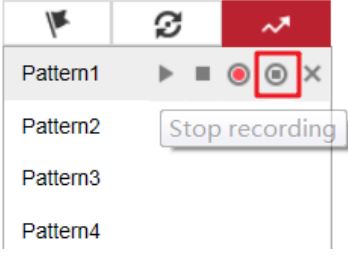
2) Use the PTZ control panel to let the camera perform pan-tilt movements, such as turning up and down, left and right, zoom in and out, and calling preset point, etc. The camera will record these action and reproduce the next time it is called. 3) Left click on Stop Recording to interrupt the recording.
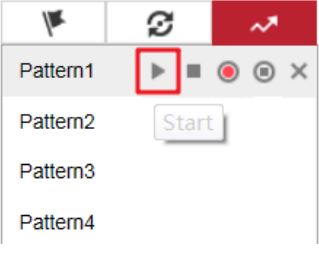
4) Click Start to call the pattern, the PTZ camera will perform the actions just recorded.
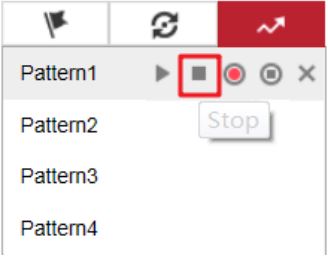
5) Click Stop to interrupt the ongoing pattern.
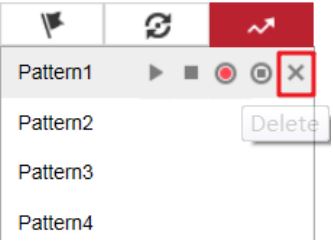
6) Click Delete to delete the pattern.
6. Limit
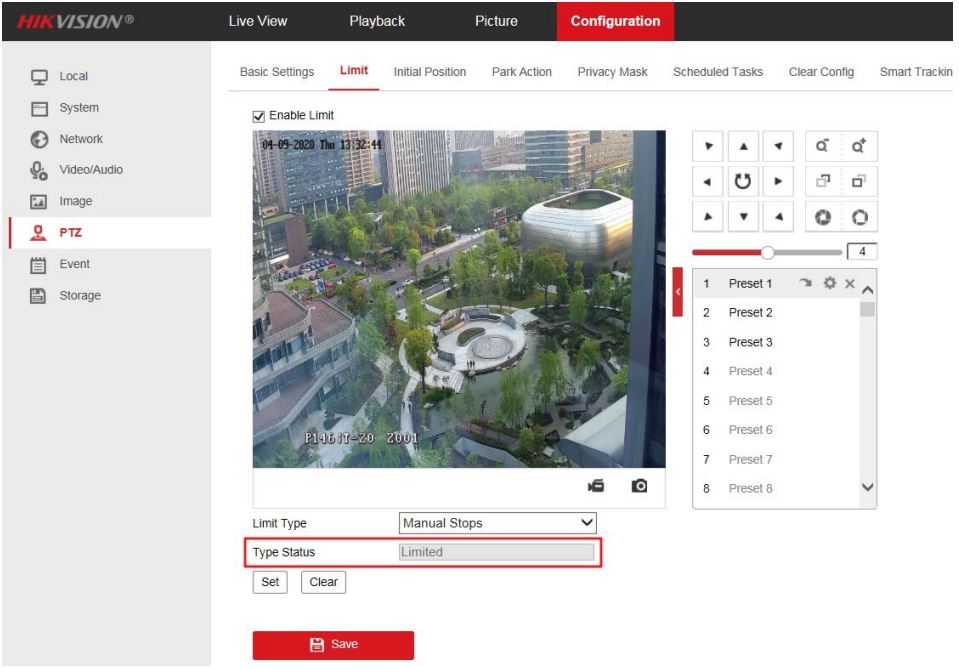
The dome can be programmed to move within the configurable limit stops (left/right, up/down). 1) Go to Configuration->PTZ->Limit interface, check the checkbox of Enable Limit and choose the limit type as Manual Stops or Scan Stops. • Manual Stops: When manual limit stops are set, you can operate the PTZ control panel manually only in the limited surveillance area. • Scan Stops: When scan limit stops are set, the random scan, frame scan, auto scan, tilt scan, panorama scan is performed only in the limited surveillance area.
Note: Manual Stops of Limit Type is prior to Scan Stops. When you set these two limit types at the same time, Manual the Scan Stops is invalid.
2) Set Limits for the selected limit type. Click Set, the setting guide text displays on live image. 3) Control the arrow buttons (or call the desired preset) to desired left limit position, and click Iris + button to confirm the position. Then the live image displays the guide text for right limit settings. 4) Follow the guide text to finish settings for left limit, right limit, up limit and down limit. 5) If you want to clear limits, click Clear. 6) Save the settings.
7. Park Action
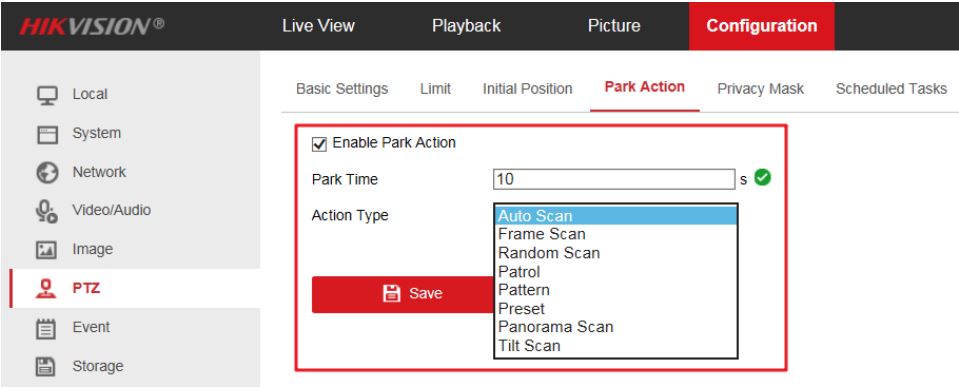
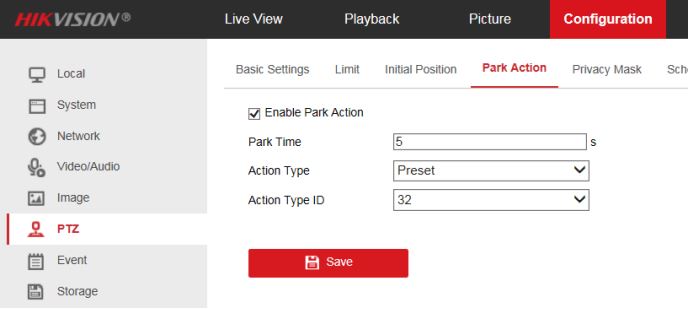
This feature allows the dome to start a predefined park action (scan, preset, pattern and etc.) automatically after a period of inactivity (park time). 1) Go to Configuration->PTZ->Park Action interface, check Enable Park Action and set Park Time and Action Type according to the actual needs.
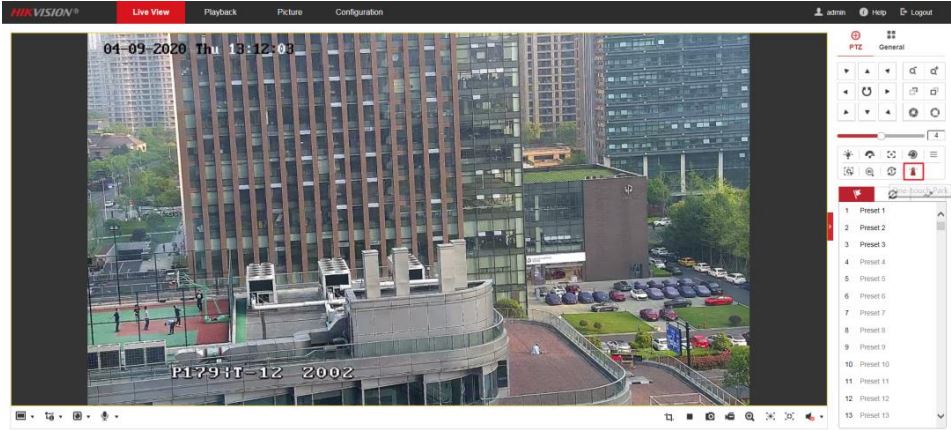
Go to Live View->PTZ interface, click to save the current view as the preset No. 32 and start park at the the current position.
8. Scheduled Tasks
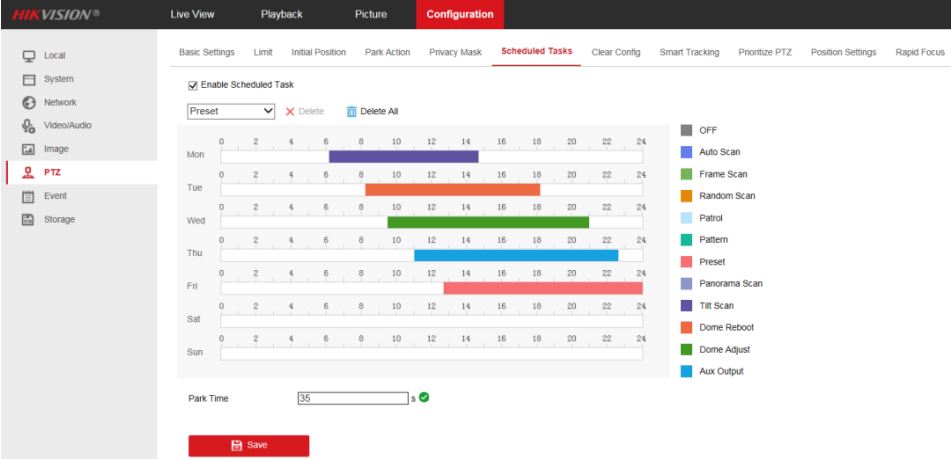
You can configure the network dome to perform a certain action automatically in a user-defined time period. 1) Go to Configuration->PTZ->Scheduled Tasks interface, Click Enable Scheduled Task to edit the task schedule. 2) Choose the day you want to set the task schedule. 3) Choose the Task Type from the dropdown list. You can choose scan, preset, pattern and etc. 4) Select the timeline of a certain day, click and drag the left button of the mouse to set the recording schedule (the start time and end time of the recording task). 5) Set Park Time. Park time means the waiting time before the camera resumes the scheduled task when it is interrupted by manual controls. 6) (Optional)After you set the scheduled task, you can copy the task to other days. 7) Click Save to save the settings.
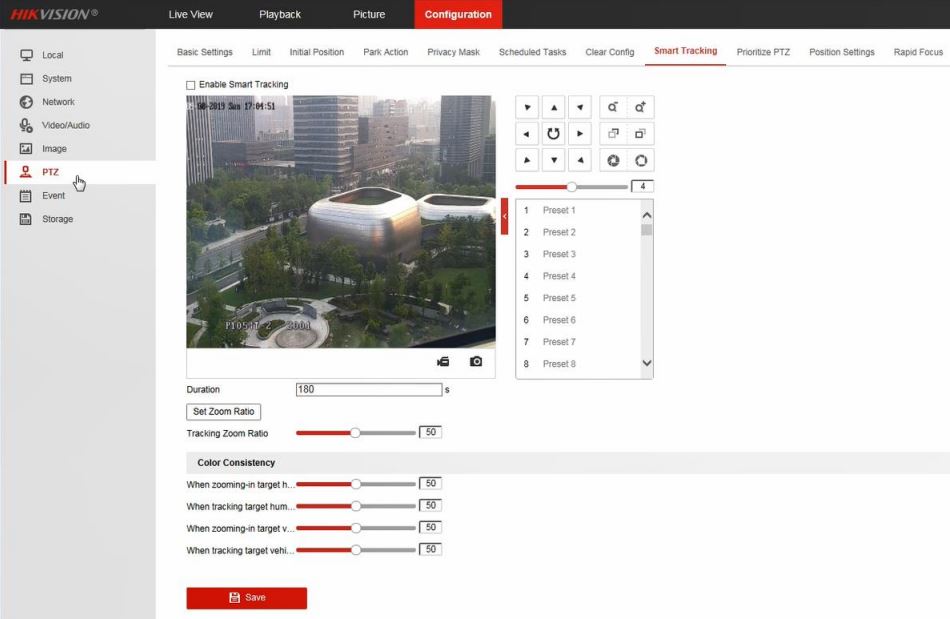
9. Smart Tracking
The speed dome tracks the moving objects automatically after you configure this function. 1) Go to Configuration->PTZ->Smart Tracking interface, check the Enable Smart. Tracking checkbox to enable the function. 2) Set zoom ratio for tracking. You can set a fixed zoom ration, or you can let the camera calculates the actual zoom ratio automatically. • Set a Fixed Zoom Ratio: Move the Tracking Zoom Ratio cursor to 0, Select a target in the live image and adjust the PTZ buttons to see the target at desired size. Click Set Zoom Ratio to set the current zoom ratio as the zoom ratio. • Camera Calculates Zoom Ratio Automatically: Adjust the Tracking Zoom Ratio to a desired value. Then the camera determines the actual zoom ratio dynamically according to the detected target size and the set value. Larger value means larger zoom ratio.
Note: As long as you set the Tracking Zoom Ratio value as not 0, the zoom ratio you set manually is invalid.
3) Set the tracking duration. The speed dome stops tracking when the duration time is up. The duration ranges from 0 to 300 seconds. 4) Click Save
10. Rapid Focus
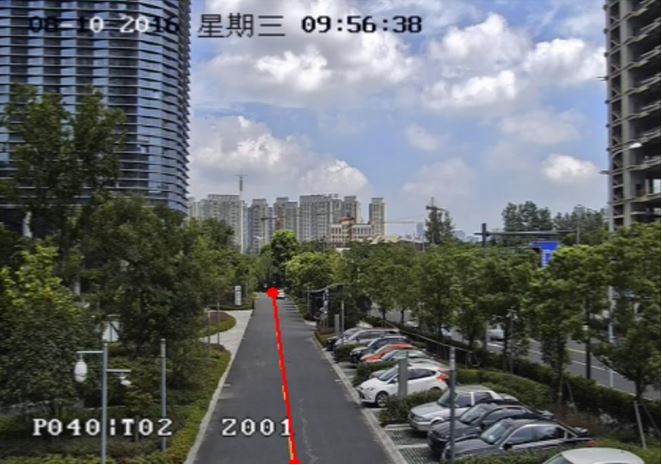
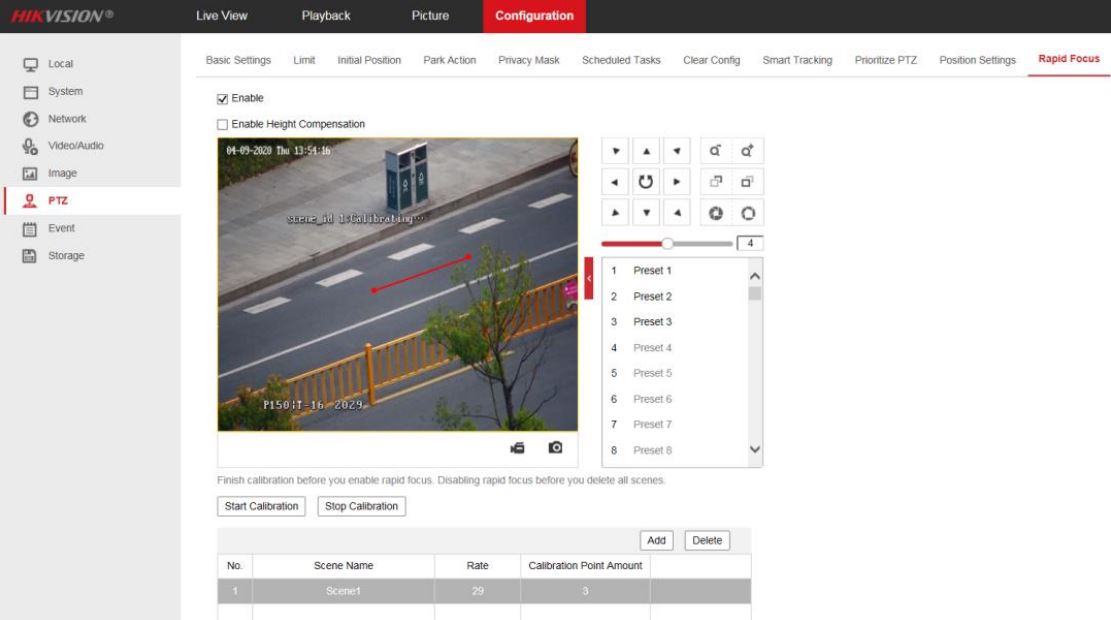
1) Go to Configuration->PTZ->Rapid Focus interface, check Enable to enable the function. 2) Adjust the camera to a desired scene via PTZ control buttons, Click Add to add the scene, and input Scene Name, Rate and Calibration Point Amount according to the actual need. 3) Select one of the scenes just added, a red line displays on live image. Adjust the length and position of the line by dragging its two endpoints.
Note: The red line is recommended to stay in the center of the scene which covering the ground at the same time. If the line is not in the center, use PTZ control to adjust the scene
4) Click Start Calibration. The camera will start self-adjustment for calibration which may take some time.
5) Save the settings after calibration succeeds.
If this was helpful, please don’t forget to rate our service below
With HikCentral Professional VMS 2.2, you can receive alerts on your smartphone, web application, or PC from any location. Paired with Hikvision’s high quality cameras, it enables monitoring from anywhere with better identification and details. This easily integrated, comprehensive central video management system (VMS) provides a host of benefits across a wide range of industries to deter crime, support remote monitoring, and help security professionals gain more real-time awareness into onsite activities.
HikCentral Professional 2.2 is a unified security system that enhances management operations, covering a variety of applications and a broad range of business needs. It can support everything from quicker response time to threats with automated alert notifications when an incident occurs, all the way to enhanced and flexible management of regional retail locations from anywhere, without having to be on site.
Other key benefits include:
Streamlines operations and management
Simplifies deployment and maintenance
Scales as a business grows
Offers better security and reliability
Provides personalized security management
With HikCentral Professional 2.2, multiple individual systems are handled with ease including third-party system integrations. For more information on the many benefits the HikCentral VMS platform has to offer, click here.
Hikvision is excited to announce the upgraded 256 x 192 resolution HeatPro Bi-Spectrum Thermal Cameras. The latest models include higher thermal resolution with the dual thermal and optical modules for better perimeter protection with 60% longer protection range, plus early fire prevention capability and superior adaptability to harsh environments. This line also comes with upgraded thermal resolution, darkness and backlight adaptability, and a longer detection range with target classification.
Other benefits include:
Upgraded thermal resolution to 256×192
Easy-to-use VCAs
Short range perimeter protection with a strobe light and speaker
Early fire prevention capability
The HeatPro Bi-Spectrum Thermal Series brings perimeter protection and fire detection to multiple applications such as residential communities, parking lots, warehouses, construction sites, and more. This line is available in bullet or turret form factor and is competitively priced to meet your budget.
Gain high precision VCA detection, real time alarms, perimeter defense and fire prevention with Hikvision’s DS-2TD4137-25/W Thermal Optical Bi-Spectrum Network Speed Dome. The bi-spectrum dome camera is equipped with intelligent behavior analysis algorithms to deliver accuracy and is designed for a wide range of demanding applications such as factories, manufacturing facilities, airports, parking lots and more.
The bi-spectrum speed dome hosts a pre-alarm system that helps you discover unexpected events immediately and respond quickly to protect your property. The PTZ (pan/tilt/zoom) feature enables detailed views over expansive areas with 360-degrees of continuous pan rotation.
Additional benefits include:
Enhance detection across expansive areas with four VCA (video content analytics) rules including line crossing, intrusion, region entrance and region exit detection.
Comprehensive protection with up to 10 scenes with VCA. Protect your assets from multiple direction and angles with one camera installation.
Mitigate risk and prevent fires with temperature exception alarms with notifications and a fire detection algorithm.
Precise detection with a temperature measurement range of -4° F to 302° F (-20° C to 150° C) and temperature accuracy of ±14.4° F (± 8° C).
Hikvision HikWire blog article Next Generation iDS-7 Series DeepinView Cameras: Advanced Technology Solves Complex Problems The next generation iDS-7 Series DeepinView cameras are fully loaded and boosted by AI video analytics technology. This DeepinView camera is ideal for actionable security and operational insights and comes equipped to detect multiple attributes, like clothing color and accessories, with exceptional accuracy. Its ability to detect unusual activities and execute automated alerts reduces false alarms by more than 95 percent.
Some important key features of the iDS-7 Series DeepinView cameras include:
Hikvision LightFighter Technology: The 4 MP camera model offers enhanced Wide Dynamic Range (140 dB) to constantly provide clear images under a strong backlight or in areas with a mix of bright and dark lighting
Hikvision DarkFighter Technology: Its unique ISP technology with advanced sensors greater than 1/1.8-inches delivers highly detailed images in low lighting conditions and at night
ePTZ Auto Tracking: Consistent tracking of people and vehicles, displaying more details of targeted objects under limited or unstable network bandwidth
Third-Party Integrations: A rich set of metadata allows third-party integrators the flexibility to use intelligent analysis results to further expand with customized or project-specific development Hikvision’s iDS-7 Series DeepinView cameras also feature a powerful 6-in-1 switchable Deep Learning algorithm. This algorithm provides detailed and valuable business and operational insights that can help users quickly locate critical information and video evidence.
Our thermal cameras provide the first line of defense against threats by quickly identifying a temperature change within an area, such as the heat caused by fire or the human body. Thermal imaging cameras use heat sensors to measure infrared energy radiating from the elements within their field of view, translating the varying temperatures into an image.
Specifically for short-range detection, Hikvision HeatPro Thermal Cameras are designed and priced for residential, commercial, and industrial applications, including:
Villas/Gated Communities
Commercial Buildings
Construction Sites
Recycling/Waste Management Sites
When a temperature change is detected, personnel can quickly respond to the source by using built-in white strobe lights, alarms, and automated voice alarms. Additional features include:
Superior visibility even in low light applications
Outstanding intrusion prevention with A built-in alarm
Detect and locate fires early with advanced fire detection
Our thermal cameras also feature the same powerful deep learning algorithms as our full portfolio. This includes accurate behavioral analysis, intrusion detection, and region entrance/exit identification, which makes them valuable for a multitude of applications.
Hikvision’s Modular IP Video Intercom Kit (DS-KIS602) is an intercom solution that enables you to greet visitors and control access to a building from anywhere. This exceptional intercom kit allows you to see, hear, speak with, and grant or deny access to people at a door from an array of devices including the indoor station, a smartphone, or tablet. Smartphone and tablet use requires using the free Hik-Connect mobile app.
The Modular IP Video Intercom bundle contains three products. The combination of these products will suit any need for a small-scale intercom system. These products include:
A modular surface door station intercom with 2 MP HD video (DS-KD8003-IME1)
An indoor station with a colorful, 7-inch IPS capacitive 1024 x 600 resolution touchscreen (DS-KH6320-WTE1)
A four-port switch that supports Power over Ethernet (PoE) to provide power to the bundled products
Eight additional modules can be connected to the main unit of the Modular IP Video Intercom Kit. The name tag module provides six additional name tags and call buttons while the card reader module allows doors to unlock via RFID cards or fobs. Additionally, the keypad module allows dialing more than 500 rooms as well as granting access via passcode.
The Modular IP Video Intercom Kit features clear audio-visual communication with noise and echo cancellation. The security camera comes equipped with a full HD, 180-degree wide field of view. It is also easy to install. All door station modules can be surface or flush mounted. Indoor stations can connect via Wi-Fi with 12 VDC power. Simple configurations allow you to get started in minutes.
Due to normal regeneration of products, Hikvision has decided to discontinue the manufacture and sales of certain network cameras; and the replacing models are available for upgrading operation. The involved models are listed as below
Discontinued Models
Recommended Replacement
DS-2CD2026G2-I(U) (C)
DS-2CD2026G2-I(U) (D)
DS-2CD2126G2-I(SU) (C)
DS-2CD2126G2-I(SU) (D)
DS-2CD2326G2-I(U) (C)
DS-2CD2326G2-I(U) (D)
DS-2CD2526G2-I(S) (C)
DS-2CD2526G2-I(S) (D)
DS-2CD2626G2-IZS (C)
DS-2CD2626G2-IZS (D)
DS-2CD2726G2-IZS (C)
DS-2CD2726G2-IZS (D)
DS-2CD2T26G2-2I/4I (C)
DS-2CD2T26G2-2I/4I (D)
DS-2CD2626G2(T)-IZS (C)
DS-2CD2626G2(T)-IZS (D)
DS-2CD2726G2(T)-IZS (C)
DS-2CD2726G2(T)-IZS (D)
DS-2CD2026G2-IU/SL (C)
DS-2CD2026G2-IU/SL (D)
DS-2CD2326G2-ISU/SL (C)
DS-2CD2326G2-ISU/SL (D)
DS-2CD2T26G2-ISU/SL (C)
DS-2CD2T26G2-ISU/SL (D)
DS-2CD2626G2-IZSU/SL (C)
DS-2CD2626G2-IZSU/SL (D)
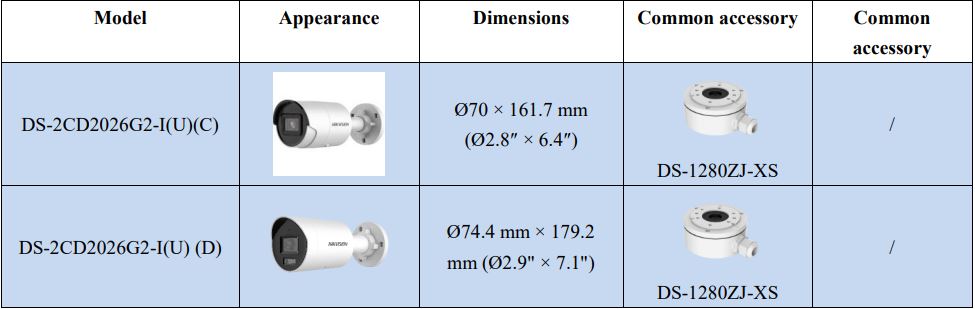
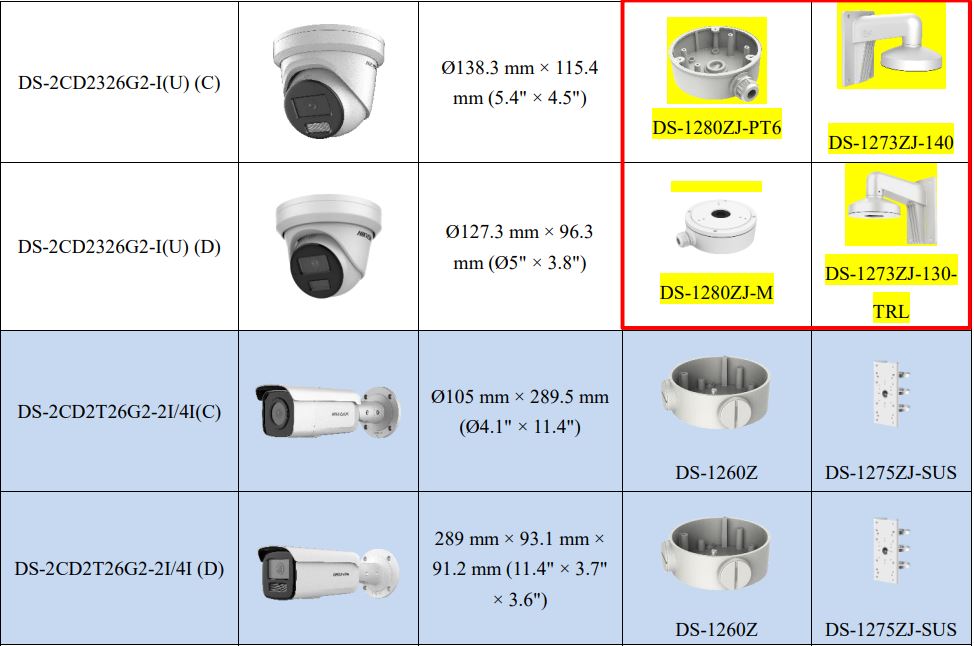
Compared to discontinued models, the appearance of some replacement models are changed, involved: DS2CD2026G2-I(U) (D)、DS-2CD2326G2-I(U) (D)、DS-2CD2T26G2-2I/4I (D)、DS-2CD2026G2-IU/SL (D)、DS2CD2T26G2-ISU/SL (D). The accessories of DS-2CD2326G2-I(U) (D) also are changed. The detailed changes are listed as below
Support Information
The standard warranty remains in effect for all products affected by this discontinuation notice. If Hikvision does not have the direct replacement in the case of warranty failure, customers will be provided with a unit of comparable or better performance but Hikvision cannot guarantee the same form or fit for the replacement product.
The 2MP Pro Series 4.0 with AcuSense(2X26G2) is upgraded from C version to D version. 1. All the function is the same but some of the cameras are difference in the size. 2. Please pay attention the DS-2CD2326G2-IU(D) will use the different bracket.
For more information or to discuss alternative solutions, please contact our local sales representative or Tech Support team
Note: – Hikvision has all rights to alter, modify and cancel this notice. – Hikvision is not liable for any typing or printing errors. – For special model’s status, please contact our local technical support team